Among the many makeup techniques, contouring has turned into a popular beauty trend among makeup artists. But you don’t have to be a pro makeup artist or even hire one to be able to apply contour makeup. Contouring is the solution if you desire a perfectly flawless, sculpted face.
What is Contouring?
Contouring is a makeup technique that uses dark and light foundation shades for highlighting, slimming down, or deepening certain desirable features. It doesn’t change your face shape; rather, it enhances your natural face shape by creating the look of higher cheekbones, a slimmer nose and chin, a smaller forehead, and a chiselled jawline. Not only does contouring enhance your natural features, but it also helps sculpt the structure of your face.
The Right Contouring Products
You don’t require any special contour kits to achieve a perfectly sculpted look. The main contouring product is the foundation; you must look for one that’s the same shade as your natural skin tone, two shades darker, and one that’s two shades lighter. It would be great if you could invest in a contour palette that could be cream contour or powder contour formulas. These come along with a highlighting shade and a deep brown contour shade.
Another great option is contour sticks that allow you to place the contour pigment accordingly with your facial features. A big, fluffy blending brush would be needed to apply and blend the contour products. Alternatively, you could use a brush to apply the contour products first, slightly blend them, and then a beauty blender for seamless blending. If you have oily skin or desire a matte finish, you could use powder contour products.
A Guide on How to Contour

You can contour your face by following this step-by-step guide and end up with results as good as those of a celebrity makeup artist.
1. Figure Out Your Face Shape
It is vital to determine your natural face shape before highlighting and contouring. The placement of the highlight and contour varies based on the bone structure and face shapes.
There are Oval, Round, Long, Diamond, Square, and Heart-shaped faces.
2. Prep the Face
Always start with clean skin before applying contour or any makeup. Cleanse your face with warm water and follow with a moisturiser to avoid makeup clumps around dry skin or harsh lines.
It’s better to pull your hair away from your face since contouring makeup touches the hairline on the forehead, past the temples, and down along your face. While optional, it would be good to use a primer to act as a buffer between the skin and the makeup products. It also allows your makeup to last longer.
3. Apply Foundation
There are three shades of foundation that will be used for contouring. One is matching your skin tone, one lighter foundation, and one darker foundation.
Applying Foundation Matching Your Skin Tone
With a foundation brush or your fingers, apply a light layer of normal foundation over your entire face (including the stretch to the forehead and below the chin). Blend the foundation well around your neck and below your chin with a stippling brush or your fingers to ensure a seamless look.
At this stage, you might want to mask any imperfections such as dark circles, blemishes, dark spots, or any redness. You could use a colour-correcting concealer and foundation for this purpose.
Applying the Lighter Foundation
The contouring starts over the foundation you’ve applied. Depending on which one you find easier to work with, you could opt for liquid foundation, cream contour products, powder products, or contour sticks.
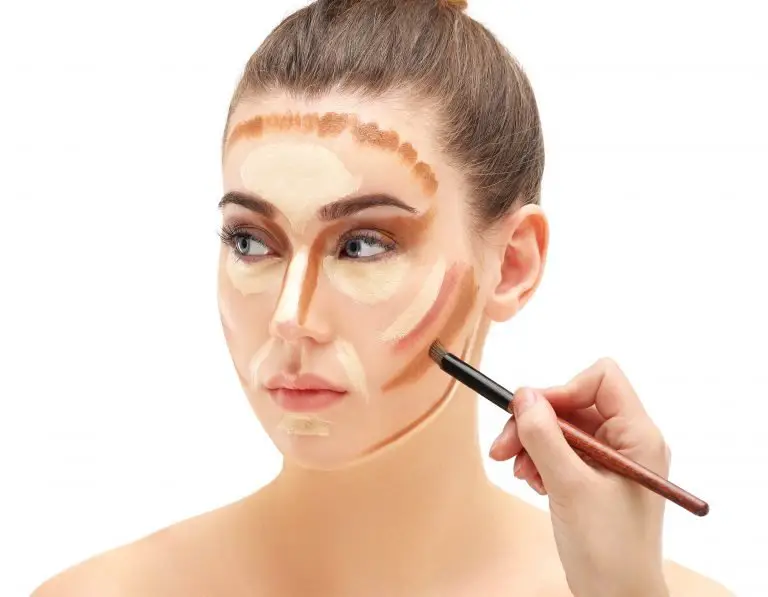
The lighter shade is applied to those face areas where the sun would naturally hit. With your finger or a foundation brush, a half-inch to one-inch stroke of the foundation must be applied to the T-zone: the centre of your forehead, above the brow lines, the bridge of your nose, your cupid’s bow (between your nose and lip), the centre of your chin, and finally the apples of your cheeks.
A stippling brush must be used to blend the product in evenly.
Applying the Darker Foundation
Following the shadows of your face, the darker shade can be used to create a makeup look with chiselled cheeks, fuller-looking lips, and a smaller forehead. You can also add definition to your jaw by contouring along the edges of your jawline. These are the shadow areas of your face.
Typically, start applying the dark shade from your forehead, right below your hairline. Apply another two lines on the left and right sides of the forehead, below your hairline. Follow by applying this darker shade along both sides of your nose, the hollows of your cheeks, and the complete jawline.
4. Blend the Makeup
It is essential to blend all the makeup that has been applied so far since you’re working with shades that are different from your normal skin complexion. With a blending brush, a fluffy brush, or a makeup sponge, blend the colours in small, circular motions while tapping for a natural-looking finish. The colours mustn’t be spread around much, and the edges must be blended well for a seamless finish.
Tip: Blend the contour upwards, especially around the cheekbones, to lift it.
5. Highlight
If you desire the light areas of your face to seem more prominent, a highlighter is what you need. Using a cream highlighter provides a more enhanced, slightly shimmery look. This must be applied in the same areas as the light shade foundation.
6. Set
Having put in so much effort to sculpt and define your face, ensuring that your contour stays put through the day is just an extra step. You could lightly dust some translucent powder to set your makeup if you had used cream or foundation for contouring. If powder contour were used, you wouldn’t require an additional layer of translucent powder.
Final Thoughts
Whether you want to illuminate the high points of your face, add depth to the desirable parts, or gain a perfectly sculpted look, contour makeup is the solution. Contouring can be done effectively for a glamorous, picture-perfect outcome regardless of your face shape, skin type, and complexion.

